Using Stability Modes (6G)
Purpose
6G modes provide self stabilization/leveling of the helicopter when the sticks are moved to the centre. This is the opposite to the standard Acro mode (used for aerobatics and 3D) which will not self level after sticks are centered and thus is inherently unstable. These modes are generally used for beginners or those wanting more of a drone feel to their helicopter. 6G modes do not provide position fixing as found with GPS systems so the heli will drift around in the wind.
Aim
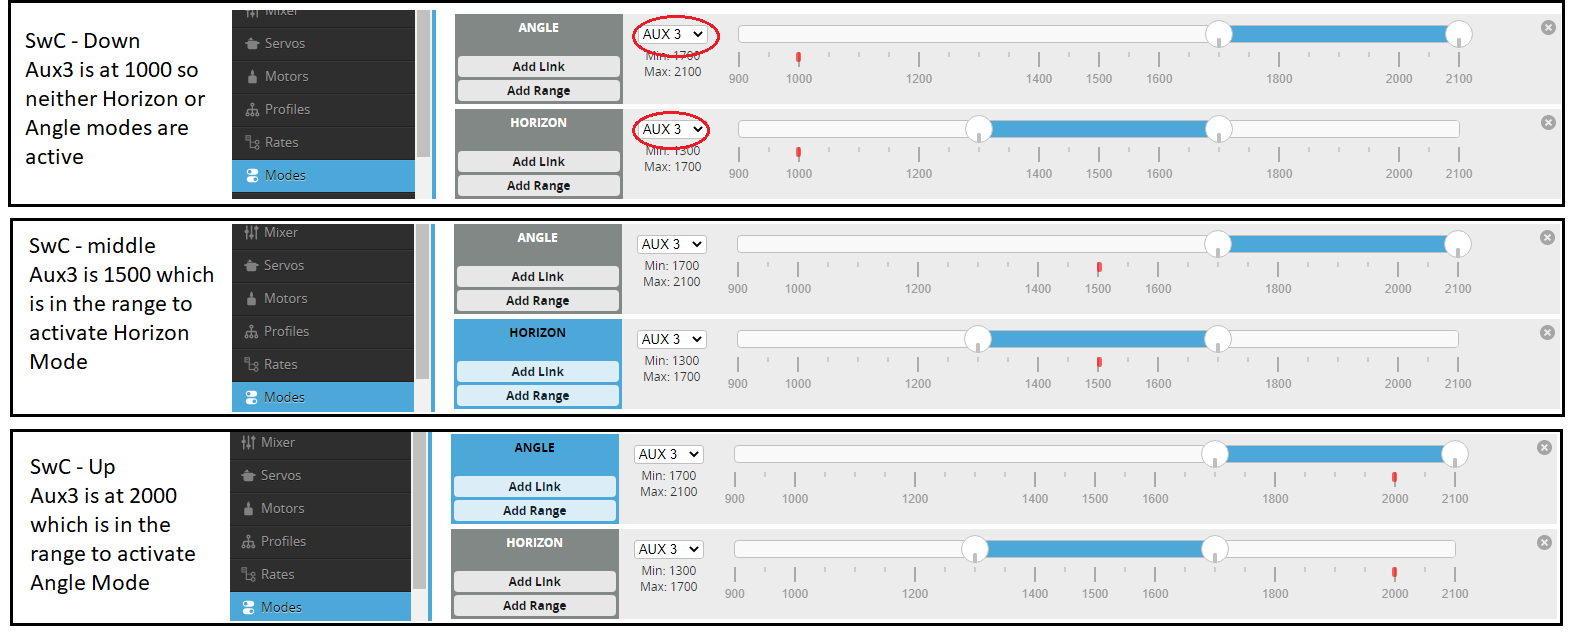
In this example we will configure a 3 position switch (SwC) to select between Stability modes. With the SwC fully down we will have Acro mode, SwC in the centre will be Horizon Mode and in the fully up position we will enable Angle mode.
Configure the Tx
We need to assign a spare channel to your 3 position switch (SwC) (can be any channel or switch).
NOTE This example shows the process for EdgeTx (same for OpenTX) but is really the same process for any transmitter.
Step 1: Assign Ch8 to the SwC in the Mixers tab

Configure flight controller
Step 2: looking at the channels in the receiver tab we can see that Aux3 is the eight channel. This matches our TX assignment from step 1. Confirm the 3 position switch changes the value seen on Aux3,

Step 3:
- Go to the Modes tab. Disable hide unused modes if nothing is visible.
- Chose the Horizon Mode. Enter AUX3 in the channel and adjust the range to cover the middle section of the control channel as shown in the picture below.
- Chose the Angle Mode. Enter Aux3 in the channel and adjust the range to cover the top section of the control range as shown in the pic below.

Step 4: Test and confirm the switch position enables and disables modes as required These values are added to the Profile so will result in (e.g. SwC down = No mode active = Acro, SwC middle = Horizon Mode, SwC up = Angle Mode).

Calibrating stability modes
## Warning ## - do not use your transmitter trims!!
Your Roll, Pitch and Yaw should all be trimmed to the stick centre configured in the receiver tab. This will be 1500 or 1520 depending on your radio.
Stability modes will try to stabilize to the calibrated flight controller level. This is rarely perfectly aligned with the actual helicopters attitude where there is no drift (least drift... there will always be some due to wind etc). In order to calibrate this in-flight we have 2 methods:
- Using the Rotorflight Lua Scripts
- Stick controls
Note that it's also possible to adjust accelerometer trim values in the Configuration tab of the Configurator.
Calibration using Lua Scripts
Select Accelerometer Trims from the Rotorflight main menu. Test fly the heli tail-in in either Angle or Horizon mode, with sticks at centre. If the heli drifts left, increase roll trim. If it drifts backwards, increase pitch trim. Each time you make a change to the trims long press the wheel/roller. The Page menu should now pop up. Select Save page. Adjust trims until the heli flies hands off without any pronounced drift in any direction.

Calibration using Stick Commands
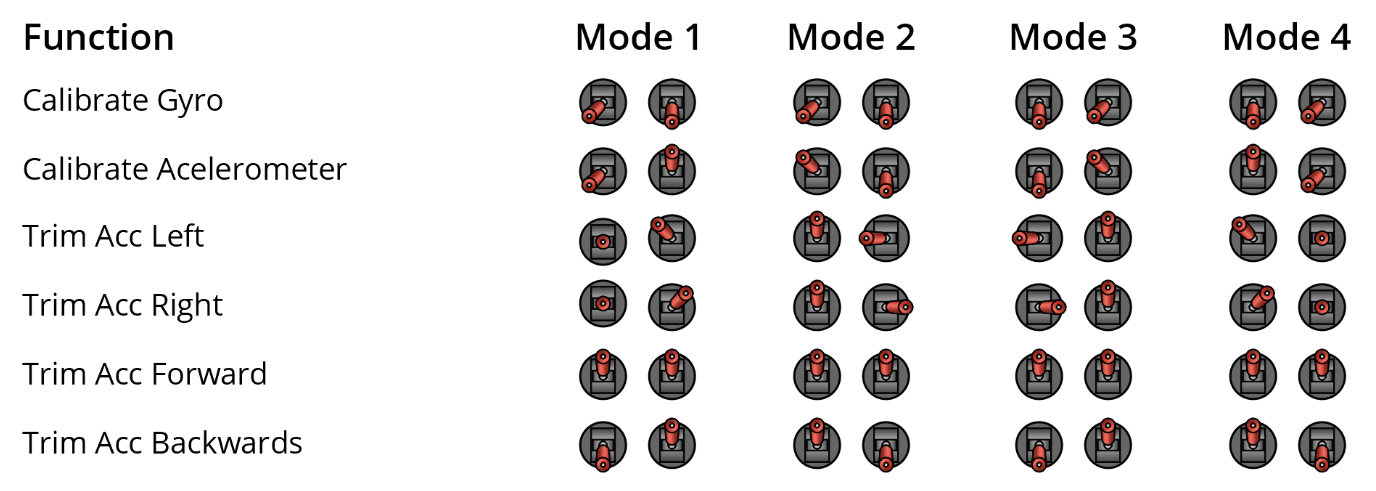
Standard 'Betaflight' stick commands work with Rotorflight. The accelerometer trims can be calibrated using these commands. To do this you must have Angle or Horizon Modes enabled.
You will also need to enable this in the CLI
set enable_stick_commands = ON
| Function | Collective | Yaw | Pitch | Roll |
|---|---|---|---|---|
| Calibrate Gyro | LOW | LOW | LOW | CENTER |
| Calibrate Acc | HIGH | LOW | LOW | CENTER |
| Trim Acc Left | HIGH | CENTER | CENTER | LOW |
| Trim Acc Right | HIGH | CENTER | CENTER | HIGH |
| Trim Acc Forwards | HIGH | CENTER | HIGH | CENTER |
| Trim Acc Backwards | HIGH | CENTER | LOW | CENTER |

For more details of the stick commands. See the Betaflight Wiki here.